Publishing a Character
EmoteLab allows you to publish a saved local character to the Steam Workshop. This guide shows you how to do it.
Open the Publish Popup
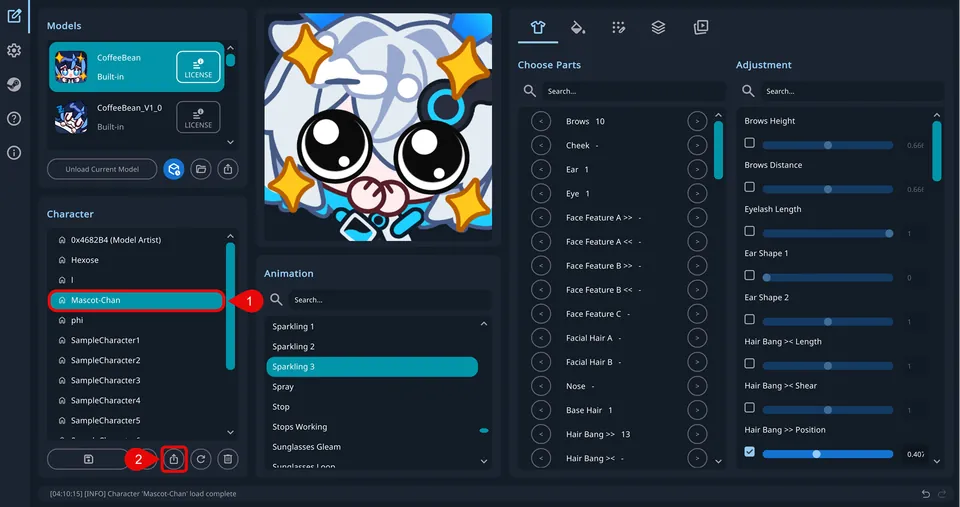
Load the model, then select the character you want to publish in the Character list. Under the character list, click the publish button (a square and an arrow icon) to open the publish popup.
Popup Fields
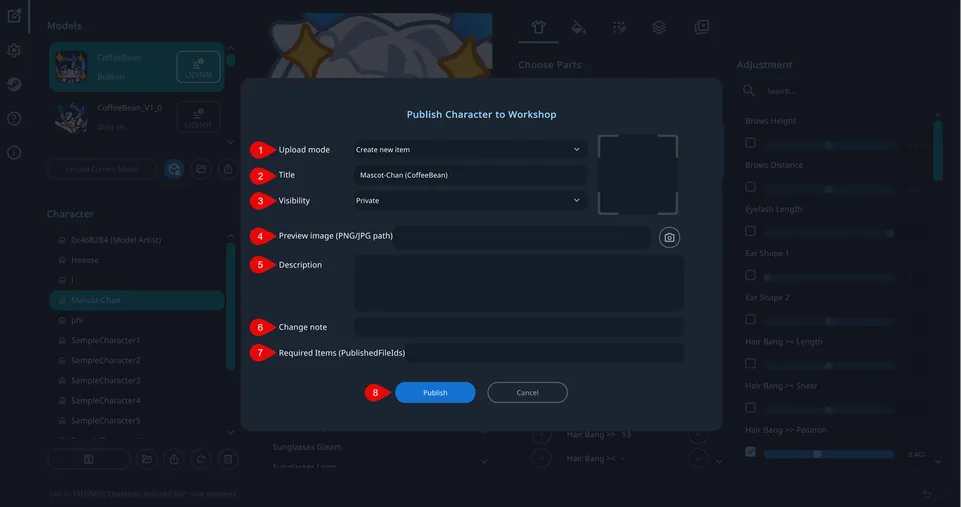
1. Upload mode
Create new itemmakes a new Workshop entry. This is the default when this character has not been published from this install before.Update existing itemreplaces an entry you already published. TheItem to updatedropdown appears only in this mode.Item to updatelists your published character items asid - title. When EmoteLab recognizes this character from an earlier publish on this computer, it selects that entry for you. You can pick a different one from the dropdown.- The match uses the character's saved name and its model. If you renamed the character, EmoteLab may open on
Create new item. Switch toUpdate existing itemand choose the old entry manually.
2. Title
This is the name on the Workshop page. For a new item it starts as Character name (model key). You can change it.
3. Visibility
Who can see the item on Steam:
| Option | Who can see it |
|---|---|
| Public | Anyone. It can appear in Workshop search. |
| Friends Only | Your Steam friends. |
| Private | Only you. This is the default for a new item. |
| Unlisted | Hidden from search. Anyone with the link can open it. |
A new item stays private until you change this. On an update, the dropdown shows the visibility already set on Steam.
4. Preview image (PNG/JPG path)
The Workshop thumbnail. See Thumbnail.
5. Description
The text on the Workshop page. Optional. If you are publishing a fan character, it is recommended to credit the original creator/IP/title here.
6. Change note
Optional note stored with this upload. It shows in the item's change history on Steam. It is cleared each time the popup loads an item to update, so write the note for this upload before you publish (no need to repeat previous update notes).
7. Required Items (PublishedFileIds)
Workshop items this character depends on, usually the Workshop model it was built for. Enter each item's Published File ID, separated by commas. Each ID must be a real EmoteLab Workshop item you can access. EmoteLab checks them before upload and reports an ID that is invalid, missing, or from another game.
For built-in models, this field should be left empty.
8. Publish
Click this button to publish the character to the Steam Workshop. You can edit the published item on the Steam website after the publish is successful.
Thumbnail
The square at the top right of the popup is the thumbnail preview.
Use your own image
Type or paste the full path to a .png, .jpg, .jpeg, or .gif file. There is no file browser. The file must be 1 MB or smaller, and EmoteLab must be able to open it. A bad path, format, or size disables Publish until you fix it or clear the field.
Capture it from the viewport
You can also capture the current viewport as the thumbnail. Click the capture button(camera icon) next to Preview image (PNG/JPG path) field. EmoteLab will capture a 512×512 PNG of that view as the thumbnail.
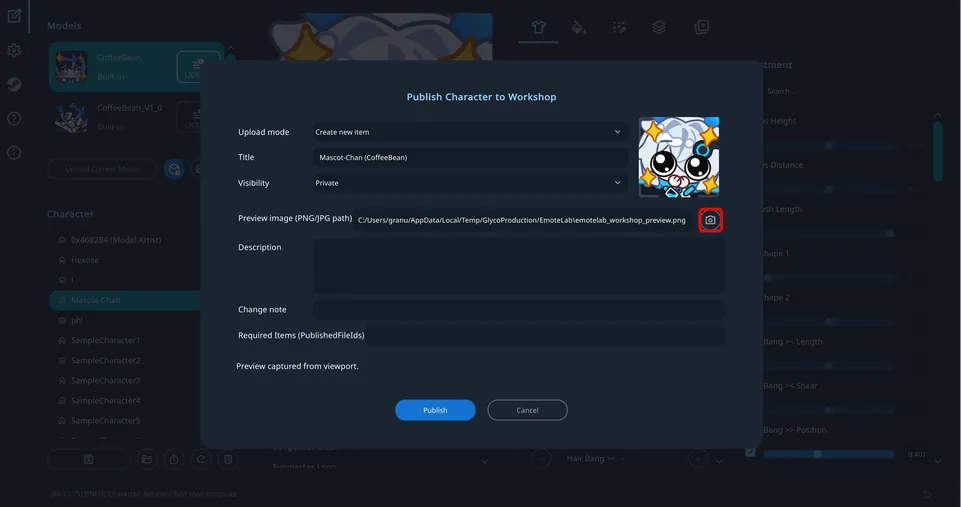
Fix the preview image before publishing. means the current path failed the size or format check.
Leave it blank
Create new item: no thumbnail is uploaded. Steam shows its placeholder until you add one.Update existing item: the current Workshop thumbnail stays. The preview square shows that image, and the path stays empty. Capture or enter a new path only when you want to replace it.
Update a Character
- Change the local character and save it.
- Select that local character and click the publish button again.
- Confirm
Upload modeisUpdate existing itemand thatItem to updateis the right entry. Change the dropdown if EmoteLab selected a different one. - Adjust the fields you want to change: title, description, visibility, change note, required items, or thumbnail. Leave the preview path empty to keep the current thumbnail.
- Click
Publish.
That upload replaces the Workshop item's character files and the metadata in the popup.
Edit the Item on the Steam Website
After a successful publish, open:
https://steamcommunity.com/sharedfiles/filedetails/?id=ITEM_ID
Replace ITEM_ID with the number from Workshop item uploaded. On your own item page, You can change the title, description, visibility, images, and related text there.