Using Custom Textures
Using Custom Textures allows you to replace the model's built-in textures with your own custom image files. This provides the most direct way to modify your character's appearance, as you're editing the actual image files that the model uses.
This video is intended as a general guide. It is not a replacement for the documentation. For complete and up-to-date information, it is strongly recommended that you read the documentation alongside this video.
What Are Custom Textures?
Custom Textures are PNG image files that replace the model’s original texture files. The image shown here is an atlas page. The atlas page contains a collection of regions.
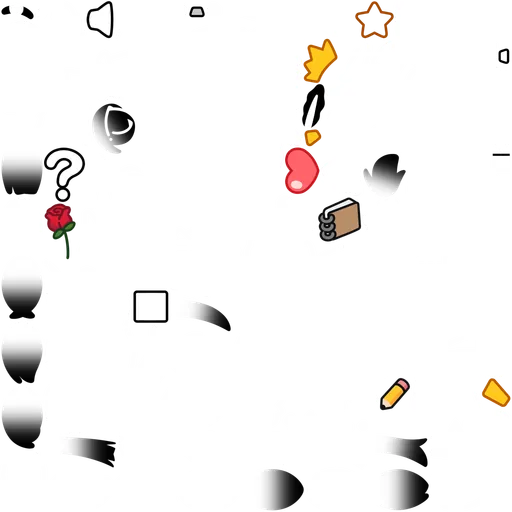
The atlas page is the image source that the model directly references at runtime. When you enable the Use Custom Textures option and reload the textures, EmoteLab looks for the atlas pages and uses them in place of the built-in textures. The changes then become visible in the viewport.
Texture Cache Folder
The atlas pages are stored in the texture cache folder at:
C:\Users\<username>\Documents\EmoteLab\Texture Cache\[ModelName]\Custom Textures
If the system Documents folder has been relocated, the files may instead be found in a different drive or path, such as:
E:\Users\Documents\EmoteLab\Texture Cache\[ModelName]\Custom Textures
When you first enable Custom Textures, the system automatically creates the following folder structure:
Custom Textures/
  ├── {atlas1}.png
  ├── {atlas2}.png
  ├── {atlas3}.png
  └── ... (additional atlas files)
How to Use Custom Textures
Custom texture settings and tools are in the Texture tab at the top of the interface.
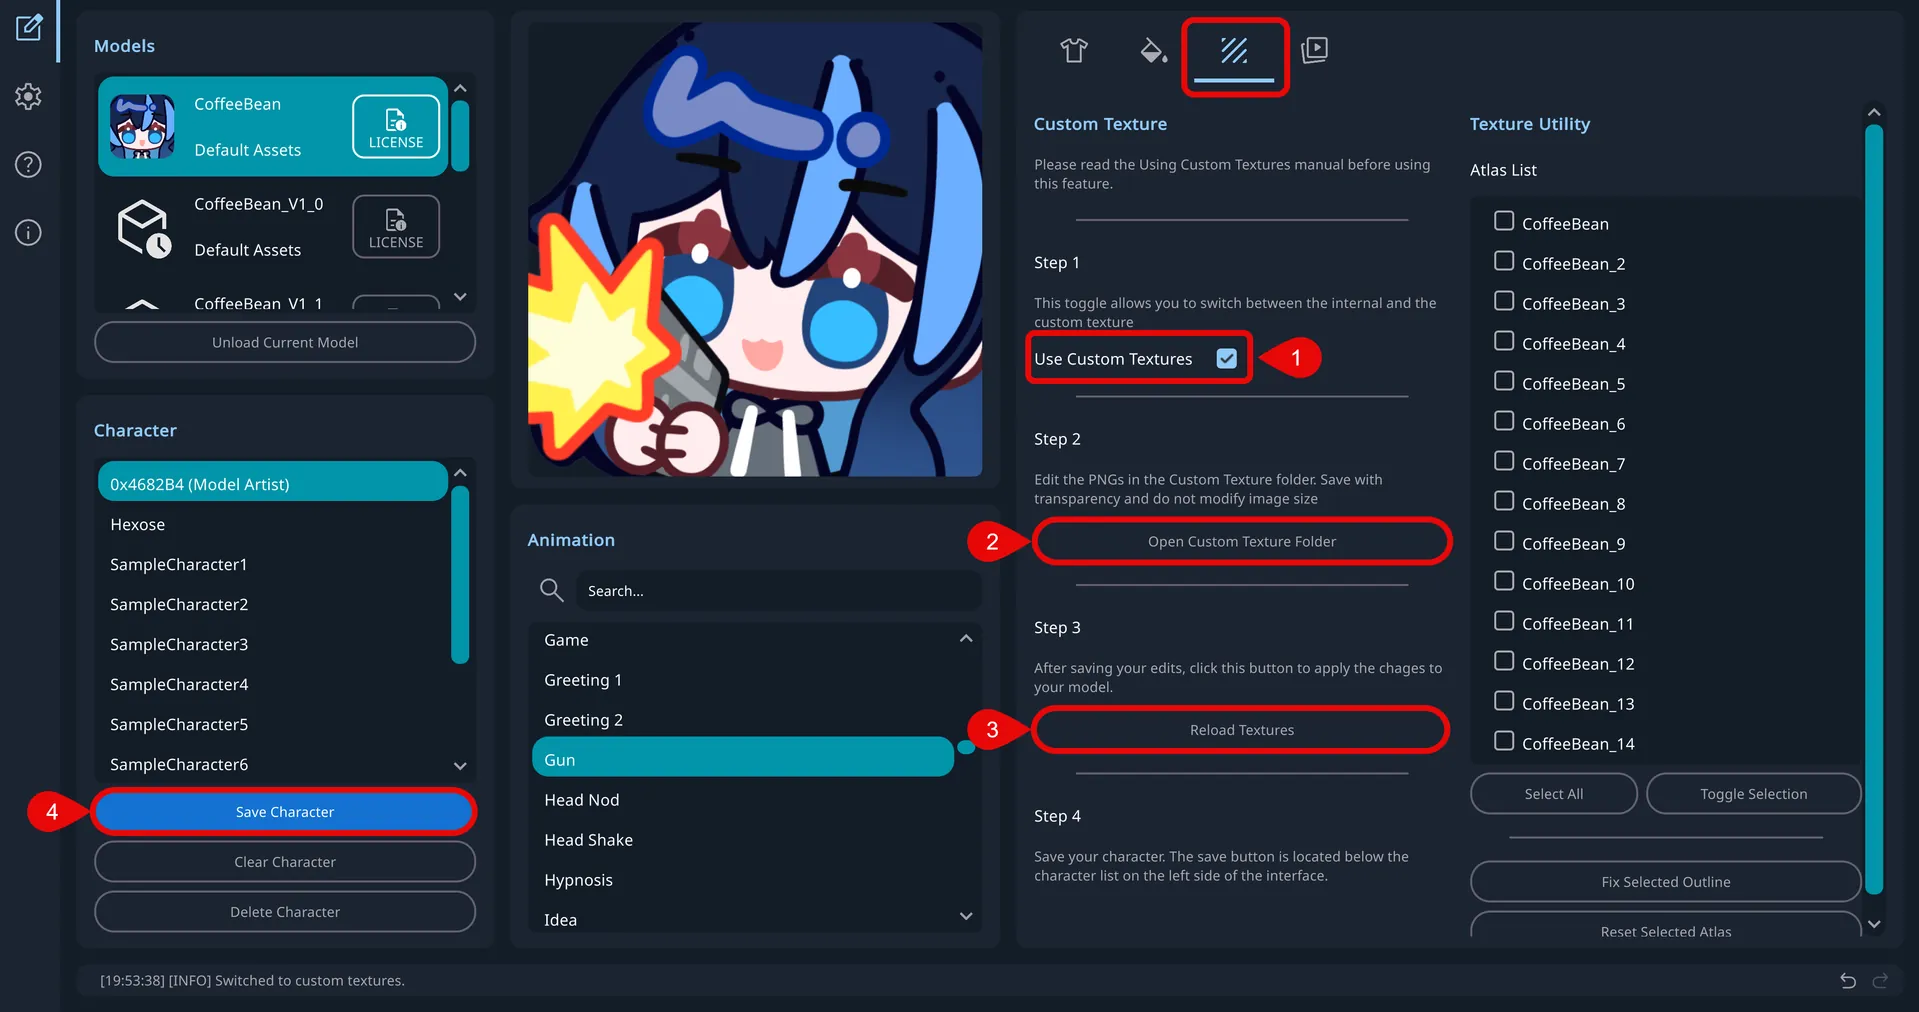
Step 1: Switch to Custom Textures
- Enable custom textures: Turn on the
Use Custom Texturestoggle. - Wait for setup: If the custom texture folder does not exist, EmoteLab creates it and copies built-in texture atlas pages as templates. If the folder already exists, EmoteLab uses the files in that folder and automatically fills in any missing pages from built-in textures.
- On first use, you will not see any visual changes since EmoteLab copies built-in textures into the custom folder as templates.
Step 2: Editing Custom Textures
- Open the texture folder: Click
Open Custom Texture Folderto open it in your file explorer. - Edit PNG files: Open the texture files in your preferred image editor.
- Follow these rules:
- Keep the same image dimensions.
- Preserve transparency (alpha channel).
- Save in place: Keep the same file names and overwrite the existing PNG files.
- Exact name matching: All atlas pages must keep the exact same names (case-sensitive) as the originals.
- Exact dimension matching: All atlas pages must keep the exact same dimensions as the originals.
- No missing files: Every atlas page must be present.
Step 3: Reloading Textures
Auto-update watches the Custom Texture folder and reloads textures after changes are written to disk. It is enabled by default. The toggle sits directly above the Reload Textures button. With Auto-update on, you usually do not need to press Reload Textures after every save.
- Save your edits in the image editor so the PNG files are written to disk.
- Return to EmoteLab. If Auto-update is on, the viewport should update on its own.
- Verify in viewport. If the preview does not update, click
Reload Textures.
- EmoteLab only notices files that have already been saved on disk. If the image is still open in Photoshop or another editor and has not been saved, EmoteLab will not see those edits.
- OneDrive, iCloud, and similar sync tools can delay or hide file-change events. If the viewport does not update after you save, click
Reload Texturesbutton. - Sync tools can also report a file change when the image itself did not change. If the model starts hitching because textures keep reloading, turn Auto-update off and click
Reload Texturesbutton instead. - It is recommended to disable sync tools on the texture cache folder and use Auto-update.
- Auto-update reloads only the atlas pages that changed.
- Reload Textures always reloads every texture page.
Switching Back to Original Textures
To return to using the original built-in textures:
- Disable custom textures: Turn off
Use Custom Textures. - Model updates: The model immediately switches back to built-in textures.
Step 4: Saving your Character
Click Save Character to save the character with custom textures. For more details, see Character Management.
Saving the character is required to preserve compatibility across versions. When a character is saved with custom textures, EmoteLab unpacks the atlas pages and stores the edited textures as individual region PNGs. This approach allows EmoteLab to manage compatibility of custom characters between model updates, where regions may be added, removed, or reordered.
Used textures only
The Used textures only toggle is at the bottom of the Custom Texture tab, below Step 4. Turn it on to save only the texture regions the character is actually using. Unused alternatives are left out, which makes saving faster and the character file smaller.
- Example: a character has Brow 1 and Brow 2 as alternatives. Brow 1 is selected, you edited that region on the corresponding atlas page, and the viewport already shows the change. Saving with Used textures only on stores Brow 1 only, not Brow 2.
- Turn the option off to save every region, including the alternatives.
This setting does not change character compatibility across different model or software versions.
If Auto-update is off and the viewport does not yet show your latest texture edits, the saved character may not match what you see. Reload the textures before saving.
Treat the custom texture folder as a working cache, not as a place to keep finished work. The atlas pages in this folder are overwritten when you load a different character or reset the current one.
To preserve your edited textures, you must save a character with Use Custom Textures enabled.
How Characters with Custom Textures are Handled
When saving a character:
- EmoteLab saves the character data (active parts, slider adjustment, coloring information) into a JSON.
- The atlas pages are unpacked into region PNGs and saved alongside the character data JSON file.
- Source: Texture Cache/[ModelName]/Custom Textures/ (full atlas pages).
- Target: [CharacterFolder]/Regions/ (individual region PNGs).
- If Used textures only is on, only the regions the character is currently using are unpacked. Unused alternative regions are skipped.
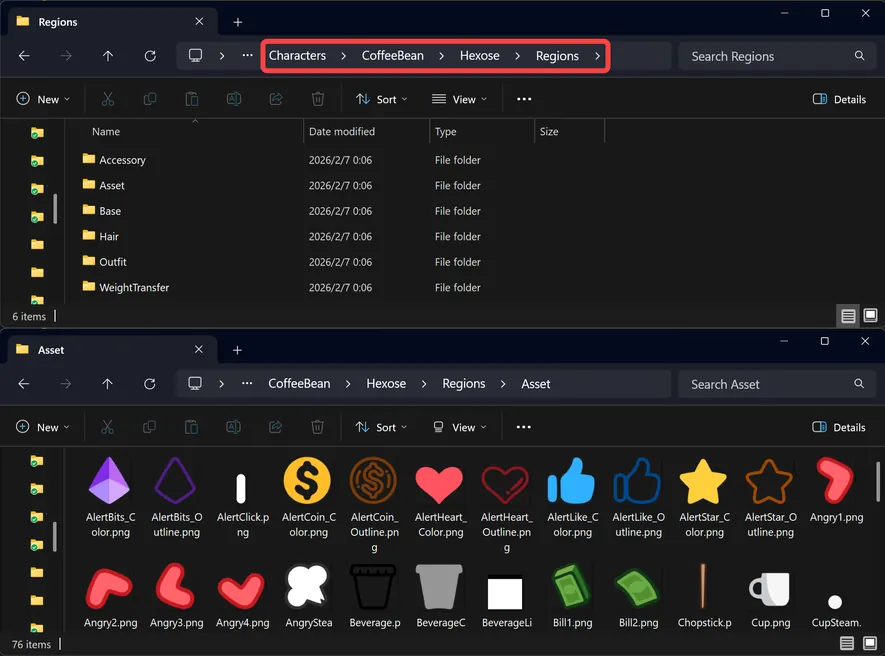
When loading a character:
- EmoteLab reads the character data JSON file.
- If the character is using custom textures, EmoteLab looks for the
Regionsfolder. - The region PNGs are packed into atlas pages and written to the cache
Custom Texturesfolder.
If a region exists (a previously edited version), the app loads the edited region. If a required region does not exist (for example, the model added new regions, or files were removed from the Regions folder), the app falls back to the built-in textures.
Texture Utility
Texture Utility provides batch operations for atlas pages.
When Use Custom Textures is enabled, atlas pages from the currently loaded model appear in the atlas list.
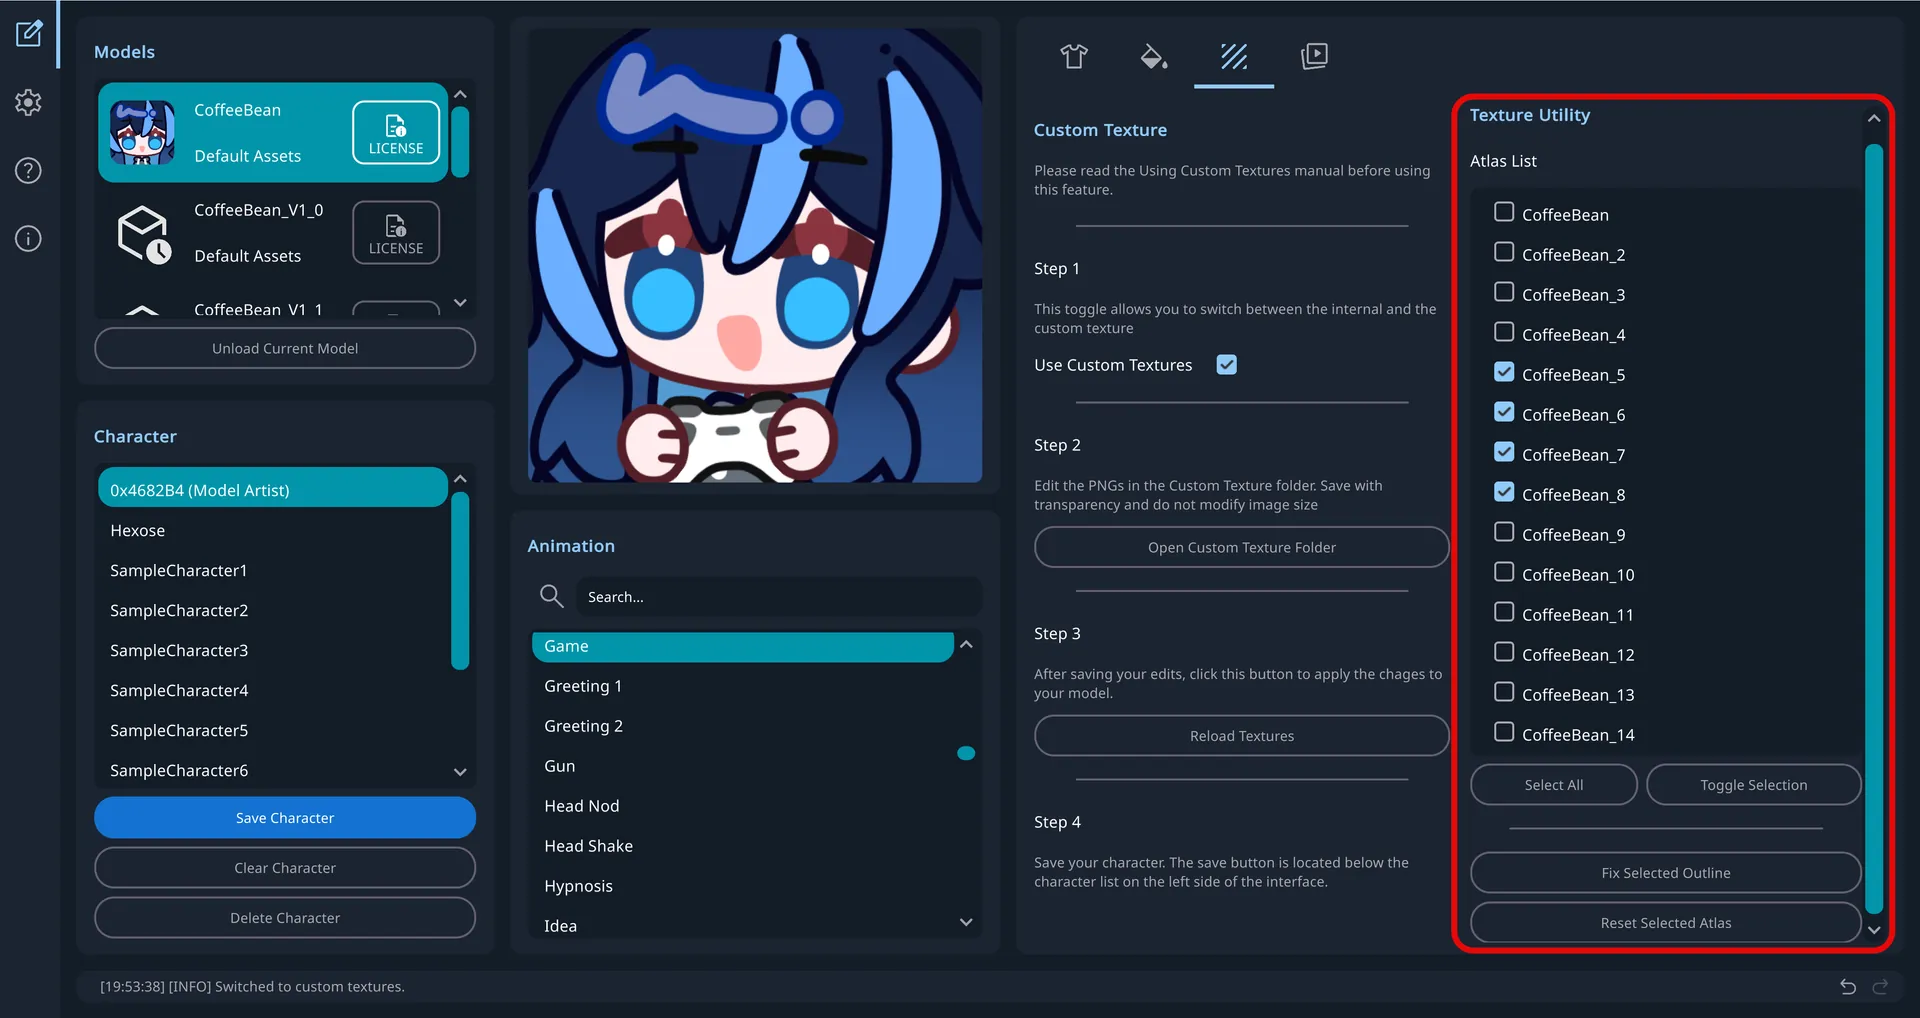
You can select atlas pages for batch processing with:
- Checkboxes for individual pages
- Select All: select all atlas pages
- Toggle Selection: invert selection
Fix Selected Outlines
Applies alpha bleeding to selected atlas pages. After editing textures in some image editors, visible white or black edge artifacts may appear around model parts. This option helps remove those outline artifacts.
Reset Selected Atlas
Resets selected atlas pages to the default built-in version.
All batch operations modify files permanently and cannot be undone. If needed, create a backup before running batch operations.